


Types of Honda Rear Window Visors
A Honda rear window visor, also known as a back or wind deflector, is a component attached to the automobile's rear window. These visors serve multiple purposes including protection from weather elements, reduction of wind noise, and enhancement of vehicle aesthetics.
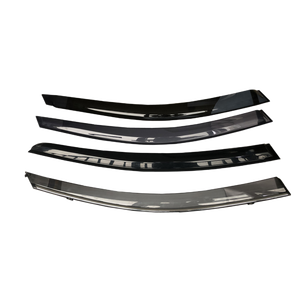
Smoke Acrylic Visors
Constructed from acrylic material with a dark gray or tinted appearance that enhances vehicle aesthetics while providing functional benefits.
Key Benefits:
- Protection from wind, rain, and debris
- Minimizes wind noise at higher speeds
- Allows window opening during light rain
- Sleek, sophisticated appearance
- Ideal for smokers who need ventilation
ABS Plastic Visors
Made from acrylonitrile butadiene styrene, a common thermoplastic polymer known for its durability and impact resistance.
Key Benefits:
- Superior durability in harsh weather conditions
- Excellent impact resistance
- Chemical resistance to automotive fluids
- Available in various finishes (painted, textured, chromed)
- Highly customizable to match vehicle style
Polycarbonate Visors
Constructed from high-performance thermoplastic material that offers exceptional strength and impact resistance.
Key Benefits:
- Maximum durability for long-lasting performance
- Superior impact resistance ideal for off-road driving
- Excellent optical clarity and visibility
- Weather-resistant properties
- Lightweight yet strong construction
Pro Tip: For Honda owners in areas with frequent rain or snow, smoke acrylic visors provide the best balance of ventilation and protection while maintaining a stylish appearance.
Specifications and Maintenance of Honda Rear Window Visors
Understanding the key specifications and maintenance requirements of Honda rear window visors helps ensure optimal performance and longevity.
Key Specifications
| Specification | Description | Importance |
|---|---|---|
| Material | ABS plastic, smoke acrylic, or polycarbonate | Affects durability, weight, and appearance |
| Style & Design | Vehicle-specific designs to match Honda models | Ensures proper fit and aesthetic harmony |
| Color | Smoke (dark gray), clear, or custom colors | Impacts appearance and light transmission |
| Size & Fitment | Model-specific dimensions for proper coverage | Critical for functionality and appearance |
| Installation Method | Adhesive tape, clips, or brackets | Affects ease of installation and security |
| Functionality | Sun/heat protection, water deflection, air flow | Primary purpose of the visor |
| Warranty | Manufacturer coverage for defects | Provides buyer protection and assurance |
Maintenance Guidelines
Follow these essential maintenance practices to keep your Honda rear window visor in optimal condition:
- Regular Cleaning: Use a soft cloth or sponge with mild soap and water to remove dirt and dust. Avoid abrasive materials that could scratch the surface.
- Damage Inspection: Periodically check for cracks, fading, or peeling and address issues promptly to prevent further deterioration.
- Avoid Harsh Chemicals: Never use strong cleaning products containing alcohol or ammonia as these can damage the visor material.
- Temperature Protection: When possible, park in shaded areas to minimize exposure to extreme temperatures that can affect the visor's longevity.
- Protective Coating Renewal: Reapply protective coatings when they begin to wear off to maintain appearance and protection.
How to Choose Honda Rear Window Visors
Selecting the right Honda rear window visor requires careful consideration of several factors to ensure proper fit, functionality, and appearance.
Compatibility Factors
- Vehicle Model: Ensure the visor is specifically designed for your Honda model
- Year of Manufacture: Window dimensions can change between model years
- Window Shape: Match the visor curvature to your specific window design
Material Considerations
- Durability Needs: ABS plastic and polycarbonate offer superior durability
- Appearance Preference: Smoke acrylic provides a sleek, tinted look
- Climate Factors: Consider UV resistance for sunny regions
Design & Style Elements
- Profile Height: Low-profile vs. standard height options
- Finish Options: Chrome, smoke tint, matte black, etc.
- Integration: How well it complements other exterior accessories
Expert Advice: For the best balance of quality and value, focus on OEM (Original Equipment Manufacturer) or high-quality aftermarket visors specifically designed for your Honda model. These typically offer better fitment and durability than generic options.
Additional Selection Criteria
- Installation Method: Consider whether you prefer adhesive mounting, clip-on designs, or in-channel options based on your installation preferences
- Functionality: Evaluate how effectively the visor will protect from wind, rain, and sunlight based on your typical driving conditions
- Price Range: Balance budget constraints with quality considerations, typically ranging from $50-$200 depending on material and brand
- Brand Reputation: Research customer reviews and brand history for reliability indicators
- Warranty Coverage: Compare warranty terms for potential long-term protection
How to DIY and Replace Honda Rear Window Visor
Installing a Honda rear window visor is a straightforward DIY project that can be completed in 30-60 minutes with basic tools. Follow these steps for a professional-quality installation:
- Clean the Surface: Thoroughly clean the rear window and surrounding area with automotive glass cleaner and a microfiber cloth. Remove all dirt, oils, and residues to ensure proper adhesion.
- Prepare the Visor: Carefully unpack the Honda rear window visor and inspect it for any damage. If it has pre-applied adhesive strips, ensure they are intact and clean.
- Peel Adhesive Backing: Carefully remove the backing from the adhesive strips without touching the sticky surface. Work in sections if dealing with a large visor.
- Position the Visor: Conduct a "dry fit" first to ensure proper alignment. Align the visor with the top edge of the rear window, centering it properly. Use painter's tape to create alignment marks if needed.
- Attach the Visor: Once properly positioned, press the visor firmly against the glass, starting from the center and working outward. Apply consistent, firm pressure along the entire surface to ensure proper adhesion.
- Secure the Edges: For additional security, reinforce the edges with small pieces of high-quality automotive-grade double-sided tape if necessary.
- Clean and Inspect: Wipe away any fingerprints or smudges from the installation process. Inspect the visor from different angles to ensure it's properly seated and aligned.
- Allow Setting Time: Let the adhesive cure for at least 24 hours before washing the vehicle or driving in heavy rain. Avoid rolling windows down fully during this period.
Installation Tip: For best results, perform the installation in a temperature-controlled environment between 65-75°F (18-24°C). Extreme temperatures can affect adhesive performance. If installing in colder weather, use a hair dryer to gently warm the adhesive before application.
Frequently Asked Questions
Q1: Does the Honda rear window visor go over the glass or around it?
The Honda rear window visor is designed to mount around the glass, typically attaching to the window frame or surrounding area. This placement creates a sleek, integrated look while allowing the window to function normally. The visor extends slightly beyond the glass to effectively deflect wind and precipitation.
Q2: How long does it take to install a rear window visor?
Installation of a Honda rear window visor typically takes between 30 minutes to 1 hour for a DIY installer. The exact time depends on your experience level and the specific visor model. Professional installation may be quicker but will incur additional costs. Following the manufacturer's instructions carefully will ensure the most efficient installation process.
Q3: Can a rear window visor be installed on any car?
Yes, rear window visors can be installed on virtually any car, provided you select a visor that's compatible with your vehicle's make, model, and year. Honda rear window visors are specifically designed to fit Honda vehicles, with precise dimensions and mounting points tailored to each model. For optimal fit and performance, always choose visors designed specifically for your vehicle rather than universal options.
Q4: Will installing a rear window visor void my vehicle warranty?
Installing a Honda rear window visor typically will not void your vehicle warranty. According to the Magnuson-Moss Warranty Act, manufacturers cannot void warranties simply because aftermarket parts are installed. However, if the installation damages your vehicle or if the visor itself causes damage, those specific issues might not be covered under warranty. For peace of mind, consider professional installation or OEM Honda accessories.
Q5: How do I remove a rear window visor without damaging my car?
To safely remove a Honda rear window visor, use dental floss or fishing line to carefully slice through the adhesive behind the visor. Gently work the line back and forth in a sawing motion. Once loosened, slowly pull the visor away from the surface. Clean any remaining adhesive with an automotive adhesive remover. Work slowly and patiently to prevent damage to your vehicle's paint or trim.


 浙公网安备 33010002000092号
 浙B2-20120091-4