Types of 4-gauge pod
A 4-gauge pod comes in different types that suit various customer needs. Here are some of them:
-
4-inch gauge pod
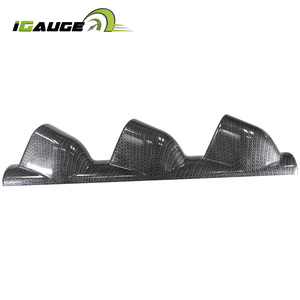
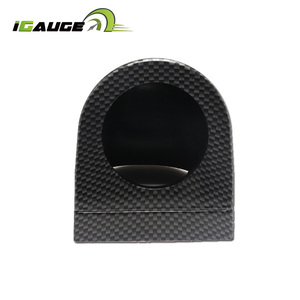
4-inch gauge pods are the most common in the market. They come in different styles, including single, double, and triple pods. A 4-inch single gauge pod has one slot for one gauge. It is an excellent choice for drivers who want to monitor one parameter closely. A four 4-inch gauge pod has four slots for four gauges. It is suitable for people who want to monitor several parameters simultaneously. The 4-inch gauge pod can also come in universal or vehicle-specific designs. A universal 4-inch gauge pod can fit in many vehicles. On the other hand, a vehicle-specific 4-inch gauge pod is designed to fit in one particular vehicle model.
-
6-gauge pod
6-gauge pods are less common than 4-inch pods. They are mostly used in high-performance vehicles that require monitoring of several parameters. A 6-gauge pod has six slots. It can be a pillar pod, dashboard pod, or center console pod. The 6-gauge pod can also have a universal design or be customized to fit in a particular vehicle.
-
GPS gauge pod
GPS gauge pods are designed to monitor the speed of a vehicle. They show live speed data and can also show other parameters like location tracking, speed alerts, and navigation. GPS gauge pods come in portable designs that can sit on the dashboard. They can also be mounted on the rearview mirror. A GPS gauge pod can have a universal design or be customized to fit in a particular vehicle model.
-
digital gauge pods
Digital gauge pods give a digital display of the data they are monitoring. For instance, an EGT gauge in a digital 4-gauge pod will show the exhaust gas temperature in digital form. Digital gauge pods are preferred by people who want accurate readings of the parameters they are monitoring.
-
custom gauge pod
Custom 4-gauge pods are designed according to the client's specifications. They can be made to fit in specific mounting locations and designed to hold particular gauges.
Specification and maintenance of 4-gauge pod
Specification
-
1. Size
A 4 gauge pod holds 4 measuring instruments or gauges, and each one is 4 inches wide. This is a common size used for aftermarket car gauges.
-
2. Mounting Options
The 4-gauge pod can be mounted on the dashboard, the A-pillar (the support on the side of the windshield), or the center console area.
-
3. Material
4 gauge pods are often made from durable plastics, ABS, or polycarbonate. These materials last a long time and resist damage or fading from the sun.
-
4. Surface Finish
Some 4-gauge pods have a shiny or textured finish. This makes them look nice and helps them match the car's interior style.
-
5. Color
4 pods are often available in neutral colors like black, gray, or white. This allows them to blend in with the dashboard and other interior features.
-
6. Gauge Compatibility
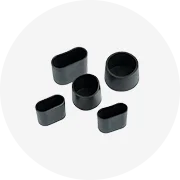
The 4-gauge pod is designed to hold standard aftermarket gauges of various types, such as analog or digital ones. It can accommodate different gauge styles and sizes as needed.
-
7. Lighting
Some 4-gauge pods come with built-in LED lights or backlighting for the gauges. This ensures the displays are visible, even in low-light conditions or at night.
-
8. Power Source
The 4-gauge pod typically needs to be connected to the car's power system. This provides electricity for the lights and any other electronic functions of the gauges.
-
9. Data Transmission
If the 4-gauge pod is connected to the car's computer or other systems, it may use data communication protocols. This allows it to transmit information between the pod and other components in the vehicle.
Maintenance
-
1. Regular Cleaning
Dust, dirt, and debris should be removed from the 4-gauge pods and the gauges using a soft cloth or brush. This prevents build-up and keeps them looking good.
-
2. Check Electrical Connections
The power supply and any data communication connections should be inspected to ensure they are secure. Loose connections can cause problems or affect gauge accuracy.
-
3. Calibration
Oil pressure and other measurement gauges should be checked periodically to ensure they are operating correctly. If needed, they should be calibrated according to the manufacturer's instructions.
-
4. Replace Bulbs
If the LED lights or backlighting on the gauges become dim or stop working, they should be replaced. This ensures the displays remain visible.
-
5. Inspect Mounting
The mounting of the 4-gauge pod should be checked. If it is loose or vibrating, it should be re-secured or adjusted to prevent damage.
-
6. Protect from Sunlight
The 4-gauge pod and gauges should be protected from prolonged exposure to direct sunlight. This can cause fading or damage to the materials.
-
7. Storage of Unused Gauges
If any positions are not being used, they should be stored properly. Their protective packaging or a soft cloth should be used to prevent scratching or damage.
-
8. Follow User Manual
For specific maintenance requirements and procedures, the user manual for the 4-gauge pod should be followed. Different brands or models may have additional instructions.
How to choose 4-gauge pods
When looking to purchase an appropriate 4-gauge pod for a customer, consider the following:
-
Purpose
Determine what kind of car the customer drives. Also, consider the purpose of the gauge pod. Is it a performance car that requires monitoring of boost levels and air-fuel ratios? Or is it a casual commuter car that requires basic information like speed and fuel levels?
-
Type of gauge pod
Consider different types of 4-gauge pods. There are universal ones, but some are vehicle-specific. A vehicle-specific pod is designed to fit perfectly into the interior of a car. This ensures the 4-gauge pod is secured and will not fall or cause distractions while driving. Consider the materials used to make the pod and its overall durability.
-
Compatibility
Ensure the gauges are compatible with the car's existing systems. For instance, electrical connections and mechanical parameters should be considered. The 4-gauge pod and gauges should be able to communicate with the car's ECU (electronic control unit). This ensures accurate data transmission and display.
-
Style
Choose an appropriate color and style for the pod. It should match the car's interior. Consider the lighting options available. Make sure it complements the car's dashboard lighting.
-
Installation
Gauge pods are usually easy to install. However, some might require professional installation. Find out if the customer is willing to install the pod themselves or have it installed by a professional. If they prefer DIY, help them find a pod that is easy to install.
-
Budget
Gauge pods come in a wide range of prices. Determine the customer's budget and help them find a pod within that price range.
How to DIY and Replace 4-gauge pod
-
Step 1: Selecting the Right Gauge and Pod
Choose a 4-gauge pod that matches the desired style and material of the vehicle's interior. Select a gauge that is compatible with the vehicle's make and model and matches the existing dashboard lighting.
-
Step 2: Remove the Existing Dashboard Trim
Carefully remove the screws holding the trim in place using the appropriate screwdriver. Use a trim removal tool to loosen the trim and carefully lift it off, taking care not to damage the surrounding area or any clips holding it in place.
-
Step 3: Install the New Gauge Pod
Position the new 4 gauge pod in the dashboard and ensure it fits properly and aligns with the surrounding trim. Secure the pod with screws or adhesive as needed.
-
Step 4: Connect the Wires and Cables
Connect the electrical wires and cables to the gauge, following the manufacturer's instructions. Ensure all connections are secure and insulated to prevent short circuits or electrical failures.
-
Step 5: Reassemble the Dashboard
Carefully reinstall the dashboard trim and secure it with screws or clips. Ensure all components are correctly aligned and the trim fits snugly to avoid rattling or gaps.
-
Step 6: Test the Gauge
Start the vehicle and check that the gauge works properly. Ensure it measures the correct value and responds to changes. If there are any issues, double-check the electrical connections and the gauge's compatibility with the vehicle.
Q&A
Q1: How is a 4 gauge pod installed?
A1: 4-gauge pods can be installed on the dashboard, the A-pillar, or even above the rearview mirror. First, select a location and a mounting method. Then, the surface where the pod will be mounted is cleaned. After that, the pod is placed, and its position is adjusted. Once that is done, the pod is secured using screws or adhesive. Finally, the wires are routed and connected to the gauges.
Q2: What is the 4 gauge cluster used for?
A2: A 4-gauge cluster is used to provide additional information about the vehicle's performance and condition. It can be used to monitor parameters, including speed, fuel level, engine temperature, and oil pressure. Thus, it helps the driver make informed decisions and understand the vehicle's status in real time.
Q3: What is the difference between 4 and 2 gauge pods?
A3: The main difference is the number of available gauges. A 2-gauge pod can only accommodate two gauges, while a 4-gauge pod can hold four. Consequently, 4-gauge pods provide more monitoring capabilities and are suitable for those who need to track several parameters simultaneously.
Q4: Can a 4-gauge pod be customized?
A4: Yes, a 4-gauge pod can be customized. Customization may include adjusting the color, shape, and size of the pod to match the vehicle's interior. It can also include additional features, such as backlighting or an integrated display.
Q5: What materials are 4 gauge pods made of?
A5: 4 gauge pods are typically made of plastics, such as ABS. This material is durable and can be painted or finished to match the vehicle's interior.


 浙公网安备 33010002000092号
 浙B2-20120091-4